How to Draw a Floor Plan and View It in 3D With Zlendo Realty
A home layout is easier to discuss when you can review both its dimensions and its appearance. A 2D plan helps you arrange rooms and openings. A 3D view adds perspective, showing how walls, furniture and finishes relate.
Zlendo Realty provides two relevant starting points: draw your layout with Floor Planner, or use the 2D to 3D Converter for a supported existing drawing.
This guide explains the difference, introduces the documented drawing workflow and links to the official Help Center instructions.
Choose Your Starting Point
Before opening a tool, identify what information you already have.
| Your starting point | Relevant workflow |
|---|---|
| You want to create or develop a layout | Draw and edit with Floor Planner |
| You already have a supported floor-plan file | Explore the 2D to 3D Converter |
| You have requirements but need initial alternatives | Explore Smart Wizard |
| You have a layout and want styling ideas | Explore Room Styler |
Switching an editor project into 3D is different from uploading an external drawing for conversion.
Explore the Floor Planner and 2D to 3D Converter to choose the route that matches your project.
Prepare Your Measurements and Room Requirements
Start with a clear reference rather than estimating room sizes while drawing.
Record the available dimensions, measurement units, required rooms and important openings. Include furniture you intend to retain and any accessibility requirements.
Keep One Consistent Reference
Use the latest drawing or measurement record throughout the project.
If a dimension is uncertain, mark it for confirmation. A digital model is more useful when its measurements are based on reliable information.
Separate Layout Decisions From Styling
First establish room boundaries, access and circulation. Furniture and finishes can then be developed around that arrangement.
This makes it easier to identify whether a problem comes from the layout or from the items placed inside it.
How to Draw a Floor Plan in Zlendo Realty
The official Version 2.0 guide describes 2D Draw Mode as the workspace for creating layouts.
Follow the 2D Draw Mode Help Center guide alongside your project.
Step 1: Select 2D Draw Mode
Open your project and use the 2D menu in the top toolbar to select Draw Mode.
The guide distinguishes this from Presentation Mode, which is intended for viewing and presenting the 2D arrangement.
Step 2: Open Build and Choose Draw Walls
Select Build from the left panel, then open Draw Walls and choose Straight Line.
The guide also documents B as the wall-drawing shortcut.
Start with the main boundaries before adding smaller details.
Step 3: Set the Wall Start and End Points
Click the starting point on the grid, move towards the intended endpoint and click again.
Continue connected segments as required. To form a closed room boundary, connect the final segment back to the starting point.
Watch the measurement labels and snap indicators while drawing.
Step 4: Use Orthogonal Drawing Where Appropriate
The guide documents Shift for toggling orthogonal drawing.
Use it when you need horizontal or vertical wall segments. For angled layouts, follow the on-screen prompts to return to non-orthogonal drawing.
Review connections at corners rather than assuming that nearby lines have joined.
Step 5: Add Doors, Windows and Openings
Within Build → Doors & Windows, choose the required element and place it on the relevant wall.
Check its position and the surrounding access. A doorway should work with the furniture arrangement and the route through the room.
Open the Full Drawing Tutorial →
Refine Measurements With AI Floor Plan Design Tools
After drawing the arrangement, review the selected elements and their properties.
The 2D Edit and Asset Properties guide explains the right-side properties panel and advanced editors.
Check the Relevant Properties
Depending on the selected element, review settings such as wall thickness and height, opening dimensions, furniture size and rotation.
Confirm the workspace units before entering measurements.
Use Floor Plan Design Software to Review Circulation
Floor plan design software provides a shared reference for checking everyday movement.
Imagine carrying groceries into the kitchen, opening a wardrobe or moving around dining chairs. Adjust the layout where necessary before progressing to presentation.
For an overview of the product, explore AI floor plan design.
How to View Your Editor Plan in 3D
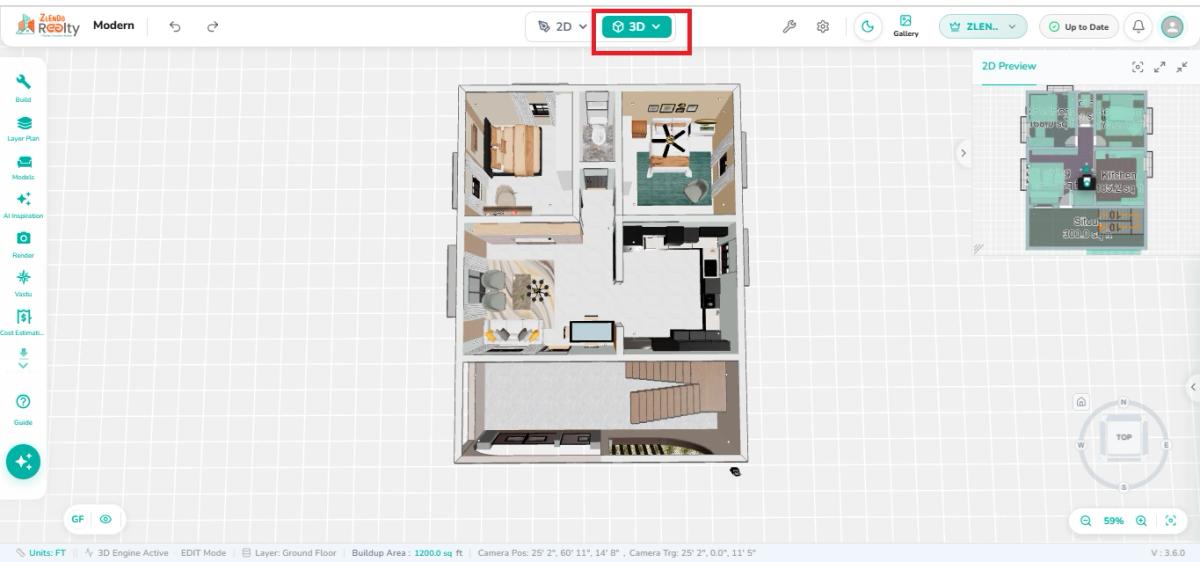
Once your layout contains the elements you want to review, use the 3D control in the top toolbar.
The official guide explains that this creates a three-dimensional representation of the editor project, including its placed elements.
Review the Overall Arrangement
Look at wall connections, openings, room proportions and furniture positions.
Compare the model with your 2D reference. If something appears incorrect, return to the relevant editing controls and check the underlying dimensions.
Read the Official 3D Edit Mode Guide →
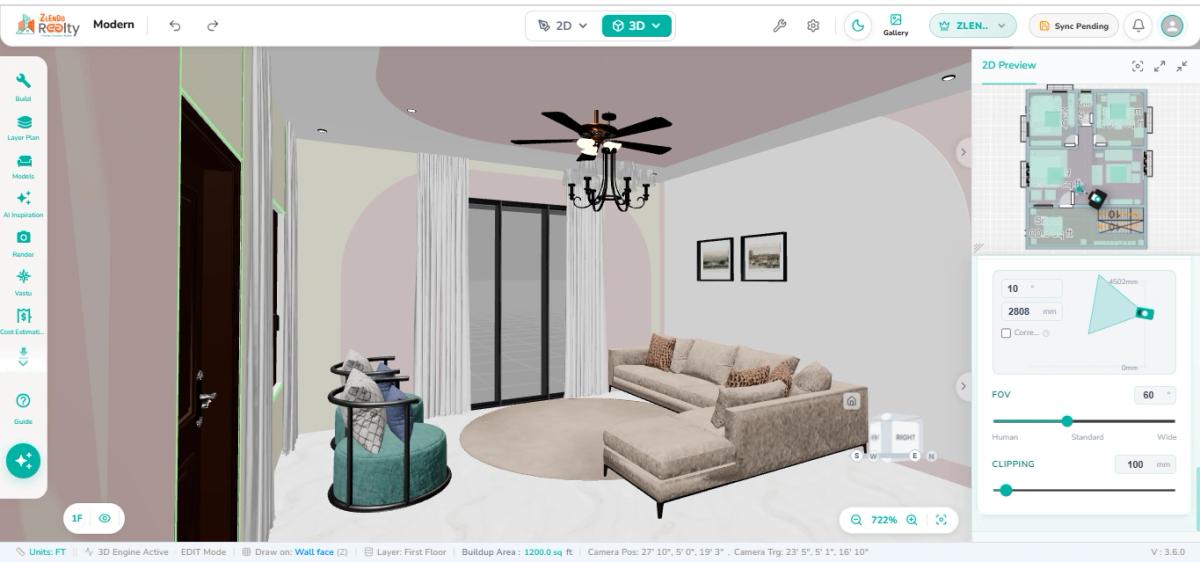
Inspect Rooms From Different Viewpoints
An overall model helps explain the arrangement. An interior viewpoint helps you discuss how furniture and finishes relate within a room.
Review more than one angle before deciding that an arrangement works.
How to Approach an Existing 2D to 3D Floor Plan Conversion
If your starting point is an external drawing, use the 2D to 3D converter workflow.
The product page describes converting a supported plan into an editable 3D representation.
Prepare a Readable Source File
Use a clear, current drawing with legible room boundaries and dimensions.
Check the uploader’s accepted formats and requirements before submitting the file. Keep the original available for comparison.
Upload Through the Converter Workflow
Open the product’s conversion entry point and follow the upload instructions shown in the app.
These are product-level workflow steps: the Version 2.0 editor tutorials reviewed here explain drawing and editing, rather than documenting every external-file upload control.
Review the Conversion Before Styling
Compare walls, openings, room boundaries and scale against the source drawing.
Correct differences before using the 2D to 3D floor plan to discuss interiors.
Conversion provides a starting model that needs review against your original information.
Add Furniture and Develop Your Interior Direction
Once the layout is checked, develop furniture and storage arrangements.
Start with essential pieces, then review the remaining circulation space before adding decorative items.
Use AI Interior Design for Focused Exploration
AI interior design can support comparisons of room styling directions.
For AI home design, ask specific questions: would a smaller sofa improve access, or would a different colour palette suit the furniture?
Keep practical requirements consistent while reviewing alternatives.
Use an AI Floor Plan Generator When You Need Alternatives
If you are still deciding how to arrange the rooms, an AI floor plan generator offers a separate route for exploring initial directions.
Compare those options against your site and household priorities before developing a preferred layout.
Explore Your Home Through Walk Mode
The 3D guide documents Walk Mode within the 3D menu, providing a first-person way to navigate the project.
Review Connections Between Rooms
Open the project in 3D, select Walk Mode and follow the documented navigation controls.
Consider the route from the entrance to shared spaces and bedrooms. Record observations that can be checked against the plan.
Use Virtual Home Design to Guide Discussion
For virtual home design, a visual review should lead to specific feedback.
“Check the passage beside the sofa” is more actionable than “make the room feel larger.”
3D home design software helps communicate the concept, while drawings and measurements remain important references.
Save, Review and Prepare Your Next Step
Before sharing the design, check that you are reviewing the intended project version.
The Version 2.0 Help Center includes separate guides for rendering and export. Consult the relevant guide and confirm the options available in your account.
Review the Plan Before Treating It as Final
Check:
- Measurement units and dimensions.
- Closed room boundaries and wall connections.
- Door and window positions.
- Furniture access and circulation.
- Differences between source drawings and converted models.
- The version being shared for feedback.
AI home design software can help you develop and explain a concept. Construction still requires the appropriate technical documentation, professional coordination and approvals.
Start Drawing or Converting Your Home Plan
Choose your route based on the information you have.
Draw a layout with Floor Planner, explore an existing drawing through the Converter, and use the Help Center to understand the relevant editor controls.
Frequently Asked Questions
How do I start drawing walls?
Select 2D Draw Mode, open Build, then choose Draw Walls → Straight Line. The guide also documents the B shortcut.
How do I create straight horizontal or vertical walls?
The drawing guide documents Shift for toggling orthogonal mode. Follow the on-screen prompts and check the displayed measurements.
How do I add a door or window?
Open Build → Doors & Windows, choose the element and place it on a wall. Review its position and properties.
How do I see my editor plan in 3D?
Use the 3D control in the top toolbar. Follow the 3D Edit Mode guide to review the model and available viewing tools.
Is switching to 3D the same as uploading a drawing?
No. Switching views displays an existing editor project in 3D. External-file conversion begins with a supported uploaded drawing.
What should I check after conversion?
Compare walls, openings, room boundaries and scale with the original drawing before developing the interiors.
Are the editor images actual screenshots?
Yes. The two embedded editor images come from the official Help Center. The featured image is a separate AI-generated conceptual illustration.
Does a 3D model mean the house is ready to build?
A model supports planning and discussion. Construction requires site-specific drawings, specifications, professional coordination and applicable approvals.
Vishwas Govindarajan
GTM Head
A passionate content writer and digital marketer skilled in creating engaging, SEO-driven content that boosts online visibility and brand growth.